Why does a green ring appear around hard-boiled eggs?
How to Prevent the Green Ring on Hard-Boiled Eggs: A Culinary Science Guide to Perfect Yolks
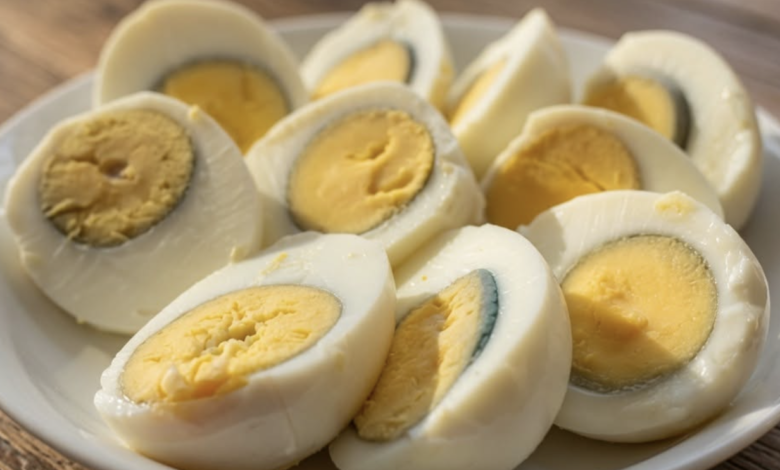
You have meticulously prepared your meal prep or a fresh summer salad, cracked open your hard-boiled eggs, and discovered an unappealing grayish-green ring encircling the yolk. This widespread culinary frustration is entirely harmless from a food safety perspective, yet it remains completely unappetizing and ruins the visual presentation of your dishes.
Even when home cooks follow standard recipe instructions, this stubborn discoloration frequently appears. Understanding the underlying chemical reactions and mastering the variables of temperature control allows you to eliminate this issue entirely. You do not need an expensive degree from a culinary institute or a professional commercial kitchen setup to achieve flawless results.
By applying basic molecular gastronomy principles to your morning routine, you can consistently produce pristine, bright yellow yolks. This comprehensive guide breaks down the science behind the discoloration, outlines precise temperature strategies, and provides actionable steps to ensure your hard-boiled eggs are tender, flavorful, and visually perfect every time.
The Molecular Chemistry: What Causes the Green Ring Around Egg Yolks?
To effectively eliminate this discoloration, we must first analyze the specific chemical reaction taking place inside the eggshell. The greenish-gray ring is not a sign of spoilage, bacterial contamination, or a substandard ingredient; rather, it is the visible byproduct of a basic thermal reaction between two naturally occurring elements.
Egg whites contain a high concentration of sulfur-bearing proteins. When subjected to extended thermal exposure, these proteins break down and release hydrogen sulfide gas. Simultaneously, the egg yolk contains bound iron.
As the internal temperature of the egg rises during an extended boiling cycle, the hydrogen sulfide gas generated in the white migrates inward toward the yolk. When this gas meets the iron molecules at the boundary layer where the white and yolk interface, a chemical synthesis occurs. This reaction creates iron sulfide, a compound that deposits a thin, dark, visually unappealing layer directly on the surface of the yolk.
While ingestion of iron sulfide is completely safe and carries no toxicological risk, it indicates that the egg has been significantly overcooked. This overexposure alters the texture, rendering the white rubbery and the yolk dry, chalky, and sulfurous in aroma.
Advanced Temperature Control: The Ultimate Preventive Strategy
The absolute key to preventing iron sulfide synthesis is rigorous temperature management. Maintaining water at a violent, rolling boil for an extended duration forces the internal chemistry of the egg to cross the threshold where gas migration begins. To achieve elite culinary results, you must shift away from continuous boiling and adopt a controlled simmering protocol.
The Step-by-Step Simmer Technique
-
Initial Heating Phase: Bring a deep pot of purified water to a full rolling boil over high heat. Ensure there is enough water volume to fully submerge the eggs by at least one inch.
-
Thermal Reduction: Carefully introduce your large eggs into the boiling water using a slotted spoon to prevent the shells from cracking against the bottom of the pot. Immediately reduce the heat source from high to low or medium-low.
-
The Simmer Window: Maintain a gentle, controlled simmer—characterized by small, sporadic bubbles rather than violent turbulence—for a precise window of 9 to 12 minutes, adjusting the duration based on the exact size of the eggs and your altitude. This range provides sufficient heat to solidify both the albumen and lecithin matrices without triggering the structural breakdown that releases hydrogen sulfide gas.
Thermal Shock and Rapid De-escalation: The Crucial Ice Bath Phase
Completing the simmering window is only half the battle. Residual heat trapped within the dense structure of the egg will continue to cook the yolk even after you remove the pot from the heating element. To halt this process instantly, you must execute a rapid thermal shock.
Immediately transfer the cooked eggs from the simmering water into a prepared ice bath—a large bowl filled with equal parts ice cubes and cold water. Leaving the eggs submerged in this freezing environment for a minimum of 10 minutes drops the internal temperature rapidly.
This rapid drop stops the internal chemical reaction cold, ensuring that the interface between the yolk and white remains free of discoloration. As an added benefit, this rapid cooling causes the internal egg structure to shrink slightly away from the shell membrane, which leads directly to our next preparation advantage.
Streamlining the Peeling Process: Shell Dynamics and Storage Longevity
Beyond achieving a pristine visual appearance, rapid thermal cooling makes the peeling process significantly easier. When the egg structure contracts sharply away from the shell, it loosens the tight bond holding the outer membrane to the cooked albumen.
Leveraging Egg Maturity for Structural Integrity
For the most effortless peeling experience, look at the age of your ingredients. Very fresh eggs possess a relatively low, acidic pH level within the white, which causes the albumen to adhere fiercely to the inner shell membrane during cooking.
As eggs age in cold storage over one to two weeks, their internal pH shifts in an alkaline direction, and the pocket of air at the tip expands. This natural breakdown of structural adhesion means older eggs peel cleanly away from their shells, leaving you with smooth, unblemished whites that look beautiful on a plate.
Optimal Refrigeration and Preservation Standards
If you do not intend to consume your hard-boiled eggs immediately, preserve their flavor and texture by storing them inside their protective shells within a dedicated refrigerator compartment. Keeping them at a steady temperature below 4°C retains their moisture and prevents them from absorbing competing aromas from your fridge. For the best flavor and nutritional value, consume your refrigerated eggs within seven days of cooking.
Perfecting Your Culinary Execution
Mastering the balance of timing, temperature control, and rapid cooling allows you to consistently avoid the unappealing green rings that ruin basic egg preparations. Transitioning from an unmonitored rolling boil to a precise, low-temperature simmer protects the delicate proteins and fats inside the egg, keeping them intact and full of flavor.
Implementing these straightforward adjustments into your meal prep routine yields flawless hard-boiled eggs that feature a tender, delicate texture and a vibrant, golden-yellow center. Pay close attention to your cooking times, use the ice bath technique consistently, and enjoy beautiful, professional-quality results every time you cook.